Oct 11, 2025
 View:1600
You use an active buzzer when you want to make sound alerts. It is easy to use in your projects. The built-in oscillator helps you make a steady tone. You only need DC power for it to work. Look at the table below for what this buzzer does and its main job:
| Definition | Primary Functions |
|---|---|
| Active buzzers are small electronic parts. They make sound or vibrations when turned on. | Their main job is to warn users or show events. These can be errors, warnings, or updates. |
Key Takeaways
Active buzzers make sound right away when you give them power. They have an oscillator inside, so they are simple to use in projects.
These buzzers work well for alarms, timers, and alerts. You only need to connect them to a DC power source to use them.
Always look at the voltage rating before you connect an active buzzer. If you use the wrong voltage, the buzzer can break or sound too quiet.
Active Buzzer Basics

What Is an Active Buzzer
Active buzzers are used in lots of electronic projects. When you give them power, they make a sound right away. This is because they have a built-in oscillator inside. You do not need to send any special signal. Just use DC voltage and the buzzer will work.
Active buzzers are different from other buzzers. The table below shows how active and passive buzzers are not the same:
| Characteristic | Active Buzzer | Passive Buzzer |
|---|---|---|
| Internal Oscillator | Yes | No |
| Sound Production | Sounds immediately when energized | Needs external signal to sound |
| Usage | Used in many electronic devices | Used in specific applications |
| Signal Type | Makes continuous or pulsed audio signals | Can make many tones based on input frequency |
You can use active buzzers in alarms and timers. They are also good for status indicators. They help you add sound to your projects easily.
Main Features
Active buzzers have features that make them simple to use. You can turn them on or off with just one signal. Microcontrollers like Arduino can control them with one pin. You do not need to make a sound frequency yourself.
Here are some important features of active buzzers:
| Feature | Description |
|---|---|
| Sound Generation | Makes sound directly when powered, thanks to the built-in oscillator |
| Control Mechanism | Simple on/off control with DC voltage |
| Voltage Range | Works from 1.5V to 24V, depending on the model |
| Frequency | Produces a sound around 2kHz (±300Hz) |
| Current Consumption | Uses less than 25mA in most cases |
| Size and Cost | Small and low-cost, fits many projects |
Tip: You can find active buzzers with different voltage ratings. Some common types are 5V, 9V, 12V, and 220V AC. Most small projects use 5V buzzers. These work well with microcontrollers.
| Rated Voltage | Operating Voltage | Max Rated Current |
|---|---|---|
| 5V | 4~8V | ≤32 mA |
| 9V | 3~25V | N/A |
| 12V | 3~25V | N/A |
| 220V (AC) | 180~250V (AC) | N/A |
You can use active buzzers in many ways:
Alarms and warnings in security systems
Sound effects for games and toys
Simple melodies in music projects
Adding sound to robotics and automated systems
Indicating device status for debugging
Active buzzers can last for years if you use them right. How long they last depends on how much you use them and the conditions they face.
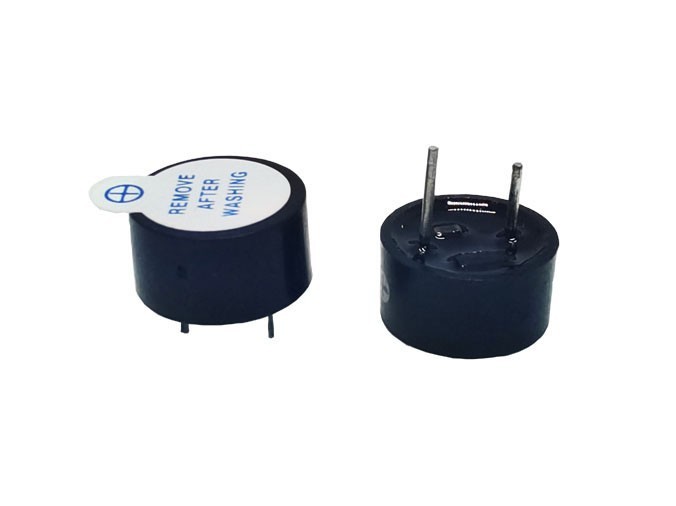
Internal Components
Inside an active buzzer, there are several important parts. Each part helps the buzzer make sound when you give it power.
Power Supply Connection: You connect the buzzer to a DC power source. This gives power to the inside circuit.
Oscillator Activation: The built-in oscillator makes a high-frequency AC signal.
Vibration and Sound Production: The piezoelectric element vibrates when it gets the signal.
Sound Emission: The diaphragm lets the sound out. The loudness depends on the design and power.
Continuous or Pulsed Sound: The buzzer can make a steady or pulsed sound. This depends on how you control it.
Deactivation: When you turn off the power, the sound stops.
| Component | Material Used |
|---|---|
| Piezoelectric Element | Piezoelectric ceramic |
| Electrode | Silver electrode |
| Packaging | Plastic case |
Note: Too much voltage or sudden spikes can break active buzzers. You should use the right voltage to keep your buzzer working well.
Most active buzzers follow safety and quality rules. You might see labels like CE, RoHS, REACH, or UL on the box. These show the buzzer is safe and good for electronics.
How Active Buzzers Work
Operating Principle
When you turn on an active buzzer, you do not need a special signal. The built-in oscillator is the key part inside. This small circuit takes the DC voltage you give and changes it to AC. The AC signal makes the piezoelectric element shake. This shaking creates a steady sound. You hear the sound right when you add power.
The oscillator inside sets the sound’s frequency. Most active buzzers make one tone, usually about 2kHz. This sound is good for alarms and timers because people can hear it well. But you cannot change the sound or play songs with this buzzer. The table below lists some main facts about how these buzzers work:
| Feature | Description |
|---|---|
| Operating Principle | Built-in oscillator produces sound when DC voltage is applied. |
| Advantages | Easy to use, less complexity, low cost. |
| Disadvantages | Fixed frequency limits ability to produce different tones, affecting audibility. |
Note: The steady sound from an active buzzer is great for simple alerts. You do not need to write extra code to make sound patterns.
Power Supply
You can use a simple DC voltage source to power an active buzzer. Most buzzers work with 3V to 12V, but always check the label for the right range. The buzzer uses a small amount of current, usually less than 32mA. This low power use makes it easy to use with microcontrollers like Arduino or Raspberry Pi.
Here are some common voltage and current ratings for active buzzers:
| Specification | Value |
|---|---|
| Rated Voltage | 5V |
| Operating Voltage | 4~8V |
| Max Rated Current | ≤32 mA |
Some buzzers can work with even lower voltages, like 2V or 3V, but the sound may be softer. Always match the power supply to the buzzer’s rated voltage for the best sound.
When you look at active and passive buzzers, you will see they use power differently. Active buzzers use more current because their oscillator runs all the time. Passive buzzers need an audio signal and usually use less current—sometimes just a few milliamperes. If you want a simple and loud sound and do not mind using more power, pick an active buzzer.
Active buzzers keep working when you connect them to power, so they use more power.
Passive buzzers need an audio circuit and use much less current, usually just a few milliamperes, while active buzzers can use tens to hundreds of milliamperes.
Tip: Always check your power supply before you connect a buzzer. Using the wrong voltage can break the buzzer or make it too quiet.
Difference Between Active and Passive Buzzer
Key Differences
You might ask how active and passive buzzers are not the same. The biggest difference is how each one makes sound. An active buzzer has a built-in oscillator inside it. You just connect it to DC power, and it makes a sound right away. You do not need to send any special signal for it to work.
A passive buzzer works in another way. It does not have an oscillator inside. You must give it an AC audio signal to make sound. This makes passive buzzers more flexible, but they are harder to use for a simple beep.
| Feature | Active Buzzer | Passive Buzzer |
|---|---|---|
| Internal Oscillator | Yes | No |
| Power Requirement | DC power supply | AC audio signal |
| Sound Production | Generates sound directly | Requires external signal to produce sound |
| Frequency Control | Fixed frequency determined by oscillator | Frequency can vary based on input signal |
Tip: If you want a buzzer that works with just a battery or a simple power source, pick an active buzzer.
When to Use Each
You should choose the right buzzer for your project. If you want something easy, the active buzzer is a good choice. It is great for alarms, timers, and simple alerts. You only need to connect it to power, and it will beep.
If you want to play different tones or songs, use a passive buzzer. This type lets you change the sound by changing the input signal. It is good for music projects or games that need many sounds.
Use an active buzzer for simple alarms or when you need a steady beep.
Pick a passive buzzer for projects that need different tones or melodies.
Note: The difference between active and passive buzzers is important when you want to control the sound. Active buzzers have a fixed frequency, so you cannot change the tone. Passive buzzers let you make many sounds, but you need extra code or circuits.
How to Use a Active Buzzer with Arduino
Wiring Example
You can hook up an active buzzer to Arduino in simple steps. First, put the buzzer on your breadboard. Next, connect the positive leg to digital pin 12 on Arduino. Then, attach the negative leg to the GND pin on Arduino. Download the example code from your computer. Upload the sketch to your Arduino Uno board.
Here is a simple code example you can use:
int buzzer = 12; // the pin of the active buzzervoid setup() {pinMode(buzzer, OUTPUT); // initialize the buzzer pin as an output}void loop() {unsigned char i;while(1) {for(i=0; i<80; i++) {digitalWrite(buzzer, HIGH);delay(1);digitalWrite(buzzer, LOW);delay(1);}for(i=0; i<100; i++) {digitalWrite(buzzer, HIGH);delay(2);digitalWrite(buzzer, LOW);delay(2);}}}
When you build your circuit, be careful with the parts. If your buzzer needs more current, use a transistor. Put a resistor of at least 330 ohms between the Arduino pin and the transistor base. This keeps your board safe from harm.
Always check your buzzer wiring before turning it on.
Look at the voltage and current numbers for your buzzer.
Do not connect the buzzer to pins that cannot give enough current.
Applications
Active buzzers work in many Arduino projects. Here are some ways you can use them:
Make beeps for alarms or warning sounds.
Give sound feedback when you press buttons or keypads.
Use buzzers in games for scoring or alerts.
Put buzzers in cars or trucks for reverse signals.
Build call bells for computers or other devices.
Use sensors to trigger buzzers in greenhouse systems.
To help your buzzer last longer, follow these tips:
Use the right voltage and control how often it beeps.
Keep the buzzer away from wet, hot, or dirty places.
Do not run the buzzer for too long or it may get too hot.
Learning to use an active buzzer with Arduino lets you add sound. This makes your projects more fun and interactive.
You can use an active buzzer to make sound alerts in your projects. Look at the table below to see its main features:
| Feature | Description |
|---|---|
| High Sound Quality | Alerts are loud and easy to hear |
| No Circuit Required | You can connect it simply, no extra parts |
Pick the voltage that matches your microcontroller.
You can use buzzers in alarms, games, or home devices.
FAQ
What happens if you connect an active buzzer to the wrong voltage?
You might damage the buzzer or make it too quiet. Always check the voltage rating before you connect it.
Can you change the sound of an active buzzer?
You cannot change the tone. The built-in oscillator sets a fixed frequency. If you want different sounds, use a passive buzzer.
Do you need extra parts to use an active buzzer with Arduino?
You do not need extra parts for most buzzers.
For high-current buzzers, use a transistor to protect your Arduino.